|
Nature of Operation: The Domino GD1 Keyless Entry System is an electronic lock that can
be used to activate any garage door opener. Pressing your personal code (1 - 6 digits) and
the 'enter key' allows you to open, stop, or close your motorized door in the
same manner as your wall push button.
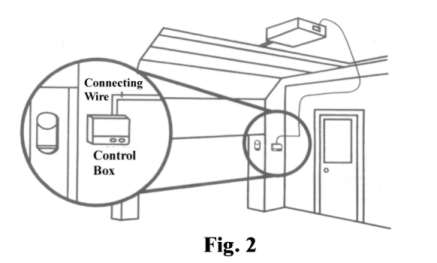
The Domino System consists of two parts:
a permanently mounted keypad outside connected by
37cm long detachable telephone type cable to a control box located inside the
garage. The control box powers the keypad with 3 'AA' Duracell batteries
(included), and is connected to the garage door opener via a two
core low voltage
connecting 'bell wire' (not included) to send an impulse signal to open,
close, or stop the motor. (fig. 2)
Installation
l.
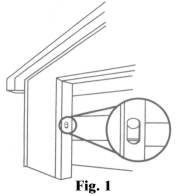
Outside keypad location: - the Domino keypad unit is weather resistant
but it is advisable to choose a semi sheltered location away from
driving rain. (see fig.1 below)
Drill a 1/2" hole from outside to into the garage. Carefully, feed
the cable from keypad into the
garage. (cable length 37cm) Screw keypad to outside surface with 2 screws (included). Do not
over tighten.
2. Inside: Insert the
keypad cable plug, with locking tab on bottom, into receptacle marked 'KEYPAD'
in Domino control box. Mount control box to wall with 2 screws (included). Take
care to ensure that the internal wall control panel is mounted to a flat
surface. (securing it to an uneven surface can distort the plastic case and
cause the micro switch inside to be
permanently depressed resulting in malfunction)
3. Connection to motor: Disconnect power to garage door opener. Connect
Domino control box to the push
button terminals on the electric opener with low voltage bell wire. (fig. 2) screw wires into the two terminals marked
'OPENER' in
control box. Insert 3 'AA' batteries (included), observing polarity. Reconnect power to garage door opener.
OPTIONAL: If there is a
garage opener wall push-button located nearby you may connect the
Domino control box to the terminals of this wall push button.
Warning: The domino system must only be connected to the
low voltage control connections of a garage door operator and under no
circumstances should the device be connected directly to a mains supply
How to program your personal code:
Step 1. Slide switch to 'on' or
'program' (Switch is located on control box)
Step 2. Press ENTER... Press YOUR CODE (up to six digits)... Press ENTER
again.
Step 3. Slide switch to 'off’ or 'operate'
How to Use Keypad:
Press 'YOUR CODE'... Press ENTER.
How to Erase old code:
Simply set new code. The new code replaces old code.
If old code still seems to be working:
WAIT 20 seconds after you have entered your new correct code
and pressed enter. Now try your old code. It will not work. There is a 20 second time
period built into the keypad after the correct code has been pressed where any number
(including your old code) and the ENTER button can activate the opener. This feature is
useful when you need to quickly stop or reverse the door. Simply press the ENTER button.
How to Check Battery Life: (normal battery life is 3-5 years)
If either a) push button on control box activates door; or
b) red indicator light on keypad lights up when pressing any number, then batteries do
not need checking or replacing.
If ( a) and (b) do not work and you know batteries are good, make sure the batteries
are firmly placed in the battery holder and they are oriented (+ -) correctly. |